Saturday, December 15, 2012

Mini Spinach and Cheese Turnovers

I had a potluck to go the other night and wasn't sure what I was going to take. But I had a pre-made pie crust in the fridge, so I came up with this on the fly!

1 refrigerated pie crust
flour for counter/rolling pin
half of a 10 oz package frozen spinach, defrosted
4 oz cream cheese
1/2 cup shredded mozzarella cheese
1/2 cup shredded parmesan cheese
1/2 teaspoon garlic powder
black pepper to taste

Preheat oven to 400* F and line baking sheet with parchment paper or spray with Pam

For filling, mix softened cream cheese with spinach, cheeses, garlic, and pepper. I used a hand mixer to get everything nicely combined.

Sprinkle a little flour on counter and on rolling pin and roll out evenly, just so you gain a few inches on each side and the crust isn't so thick since it will be doubled over on the edges.

Use a small round glass (I used lid of the Pam spray, washed) to cut small circles out of the pie dough. With the size I used, I got about 25-30 circles from one pie crust. (after cutting once, re-rolling scraps, and cutting again)

Place pie crust rounds on lined baking sheet and dollop a scant teaspoon of filling mixture on each round, slightly offcenter. Fold each round in half, over the filling, and seal edges with fork.

Bake in preheated overn for 8-12 minutes, until lightly golden on top and lightly brown on bottom.

Try not to eat them all if you are supposed to share with others.

*I only had 1 pie crust, they usually come in a 2 pack but I had used the other one in something else. Easily double this recipe by using both pie crusts, the full 10 oz package of spinach, the full 8 oz block of cream cheese, and double the remaining ingredients.


Thursday, December 13, 2012

Pink and Yellow Chevron Table Runner

My quilt guild does a swap every year in December where we put some fabric into a baggie and exchange them. We make something and give it back to the owner. This year I got a lot of polka dot fabrics, one that kind of reads as a solid, and a floral. I ended out sketching out a little chevron pattern and turning it into a table runner. Some of the fabric pieces were small so I had to keep changing the size of my starting blocks, but I think it turned out cute, and the gal who received it liked it! We were "allowed" to add one more fabric to what we received, and I chose to interpret that as adding one to the front, and then using another piece from my stash for the backing Cheesy


I just quilted along the lines created by the pattern, and I lightly drew the lines out into the border so I could follow them and not have crooked quilting in my border.


Also, I've been trying to figure out what my "thing" is in quilting, or what makes my quilts unique to me, my personal signature. I know someone that puts a red square in all of her quilts, and someone else who puts a tiny piece of contrasting fabric in her bindings. The last few projects I've worked on I've switched a few fabrics out for other ones somewhere in the pattern, you can clearly see in this project I put in five triangles of the red dot in place of the fabric that should be there. Anyhow, I think this might be something I continue to do, as long as I can keep doing it in a thoughtful manner (for this one I carefully thought about where to place these and tried to do it in a way that causes the eye to move across the quilt) instead of just because. It's not "super unique" or never been done before, but it feels genuine for me :)

Sunday, December 02, 2012

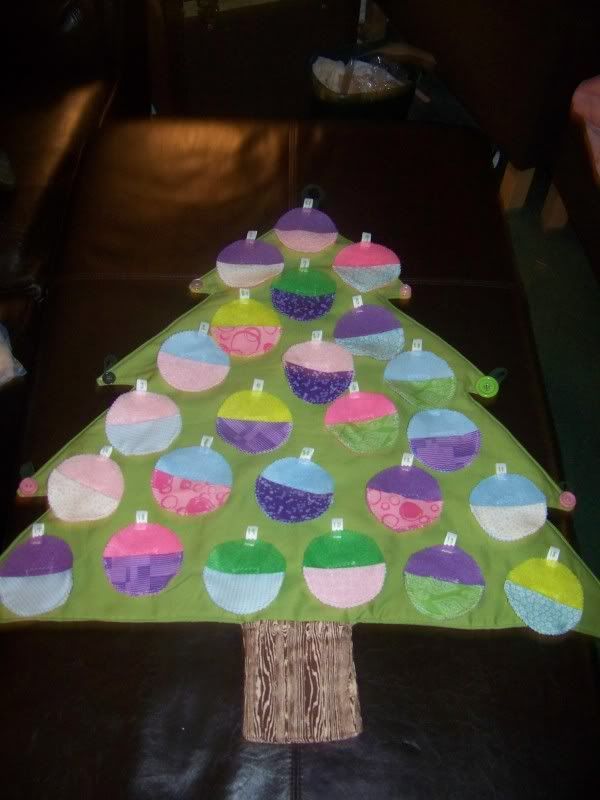
Christmas Tree Advent Calendar

This is an Advent Calendar I made last year in a Craftster Swap I organized.

I made this Advent Calendar for my partner in the 2011 Advent Calendar Swap! (If you click "show images only," you can quickly see all the great advent calendars and gifts made in this swap!) My partner said her color scheme for her tree is purple, pink, light blue, and bright green so those are the colors I used for the ornaments.


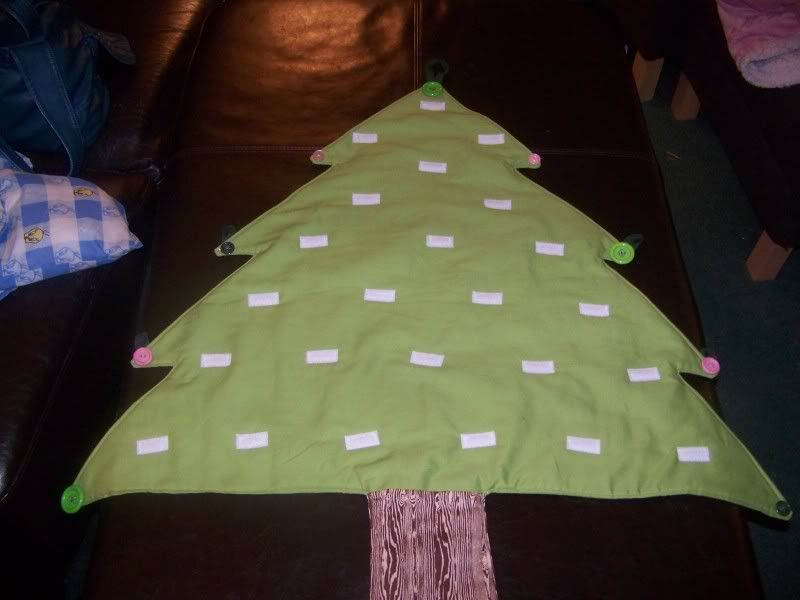
Here is the base of the tree. I made a half tree template out of poster board and then cut out two on the fold of the green fabric (which was a new Ikea sheet that I had used part of in a different project). I cut the bottom so that there was a 6 inch piece in the middle that jutted out 1/4 inch so I could sew the tree trunk onto it. I had the awesome faux wood fabric from kittykill that I've used in  a few projects. After sewing the trunk onto each side I sandwiched it inside out with a piece of batting in the middle and stitched around. I put a hanging loop in the top of it before I stitched.


After turning the tree right side out I top stitched (edge stitched?) all the way around the outside, including the turning hole. I placed my ornaments on the tree and marked an x where I wanted to put the velcro. Then I stitched the rough side of the velcro on and was done with that part!


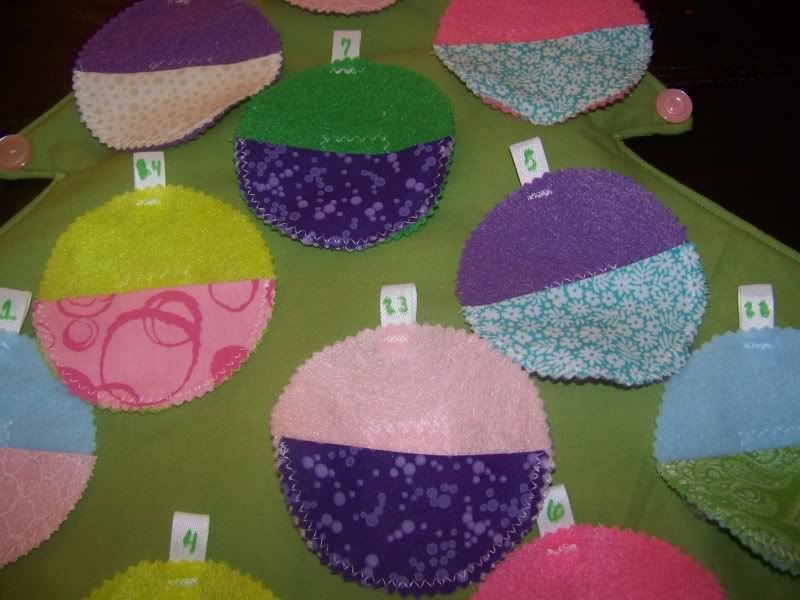
For the ornaments I cut out one circle with my pinking shears from felt and one circle with pinking shears from patterned cotton material. I stitched the loopy side of the velcro onto the back of the felt and then folded the cotton circle, wrong sides together, and placed it at the bottom of the felt circle. I zigzag stitched around just the bottom half of the circle, so the folded part of the circle became a pocket. Then I stitched a bit of twill tape onto the top to look like an ornament hanger and wrote the day on it.

Oh yeah, I had only put a hanger on the top to begin with, so I added hangers onto each point of the tree because they were flip-flopping around. But I did it with a dumb color of thread so I ended up covering the stitching from that on the front with cute buttons!

Hopefully it's fun to decorate the tree a little bit more each day!

Monday, November 26, 2012

Ouch Pouch

 I recently made this Ouch Pouch for a secret santa swap after seeing this one on my friend's Pinterest.


I made a basic pouch using the Straight Sided Triangular Cosmetic Bag Tutorial from Craftster and just made it a bit wider and taller.

Before stitching in the zipper, I quilted the outside pieces to pieces of batting in a square spiral pattern. Then I made some templates for my letters, cut them out, and used some Wonder Under to attach them. Then I stitched around the raw edges and completed the bag.


I had to stuff it with some goodies to be a good Ouch Pouch, right? My friend does martial arts and her pin mentioned that she would like one of these to take with her to her classes.


I put in lip balm, hand cream, aloe vera gel, bandaids, alcohol wipes, antibacterial cream, hand sanitizer gel, tissues, ibuprofen, and lip balm.


Wednesday, November 14, 2012

More finished blocks and a new Charity project

I'm still working away on the 36 (+) blocks I am making for my Craftster Swap! I say 36+ because while it's supposed to be 3- 12 1/2 inch blocks per person, in some cases I made more or they asked for a slightly different number of smaller blocks that added up to 12 1/2 inch blocks.


A few of them mix mastered to show some combos


I mailed out to 4 partners today for a total of 18+ blocks I believe, since two of those partners I was in two groups with so they received 6 blocks each. This swap isn't due until mid-December, so I feel like I am staying on top of it and won't have to rush at the end!


In other news, I've joined a Charity Quilting circle on Flickr that I'm pretty excited about. It's part of the do.Good Stitches group which my friend Kim told me about. I am hosting December so I will be sure to post more about it! For now, I need to figure out what pattern and color scheme to ask the others to make!

Monday, November 12, 2012

Giddy-Up Cowboy Quilt

I've been working on this project for my friend kittykill since I found a remnant of the cowboy fabric (the light blue background with cowboys and fences in the center of some of the blocks). I was going to make a table runner or something, but then I kept finding more and more fabric that would work well together, so I ended up making a lap quilt! The dark blue bull riding fabric is especially funny to me, it works perfectly in this quilt but I can't imagine many other uses for it Smiley

I used the inspiration from this quilt~
http://kelbysews.blogspot.com/2012/02/im-feeling-whimsical.html

Besides the above mentioned, I got the cowboy boot fabric, the red bandana fabric and the cowboy hats specifically for this project, but a surprising amount came from my stash and worked well, including the white and tan print, the brown with white polka dots, the brown with white dots in a horseshoe pattern, the blue bandana on the back, and the binding, which I think kind of looks like rail fences Cheesy


I pieced the back from an extra block I made for the front and then realized it would too gigantic, plus a strip I cut off the front and then other fabrics I had left.


I quilted each section differently, in a square spiral pattern in the block section, vertical lines in the small strip section and horizontal lines in the larger strip section.

I guess I didn't take any pics that show the binding very well, this one might a little bit.


Sorry I had to model the quilt on my love seat, my mom usually holds them up for me but she has a broken shoulder and nobody else has been around (except for the nephs, who are too short Smiley )

Sunday, October 28, 2012

Fabric Noms 2

The day I receieved my last order from the Fat Quarter Shop I actually placed another order...hey, they were having a free shipping sale, and there were a couple more fabrics I had forgotten to get! I also placed an order on etsy for some fabric I had on my Pinterest for a while. As you can see, I'm on a massive gray and orange kick! Also loving turquoise/aqua and lime green right now.


Far left is Maude Asbury Coral Kitchen RicRac, which I found on Etsy, all other fabrics are from FQS.

Left to Right:
  • Wildflowers Collection Silver Tonal Damask
  • Wildflowers Collection Silver Solid
  • Bella Solids Gray
  • Bella Solids Etchings Slate

Left to Right:
  • Momo Oh Deer! Sky Tiny Deer
  • Momo Oh Deer! Leaf Tiny Deer
  • Momo Oh Deer! Tangerine Tiny Deer

Left to Right:
  • Violet Craft Madrona Road Blue Broken Herringbone
  • Bella Solids Coral 
  • Riley Blake Gray Small Tonal Chevron Yardage
  • Lotta Jansdotter Bella Schooner Weave


So, I have all this fabulous fabric, plus a couple shopping trips worth of noms from Fabric Depot, which I may or may not get around to posting, so I am putting myself on a fabric buying time out through the end of the year. I can buy batting and spray basting, but no fabric. Unless, you know, I really really need it to finish a project ;)

Also, I was able to borrow a machine while I was in the shop, and used it a bit, but to my surprise my machine was done a couple weeks earlier than the estimate! I'm happy to have it home early, but if I'd known it would have only taken a few days I wouldn't have gone to the trouble to borrow one.


Monday, October 22, 2012

Double Baby Quilts

My cousin recently had a baby and I loved her color scheme--red, black, white, and gray! I lucked onto a boxed set of Michael Miller First Sight fabric that came with Fat Quarters, a cute panel, ribbons, a board book, and patterns for a great price. Since it's slightly quirky fabric, I checked with my cousin first before I got it, but she loved it so I got it and got to working!

After a loooooot of work, I had this quilt top completed~


It's the Mod Mosaic Tutorial and I love the results! But, when I looked at the results I realized I hadn't really used up very much of the cute fabric I had bought.

So I started a second quilt top before I basted, quilt or bound the first. I had a fairly simple but striking half square triangle quilt pinned to Pinterest for awhile, so I started to make HSTs. And I made them, and made them, and revised my plan a few times to include some solid red squares in each block....and then I decided to include some solid gray large squares in the overall pattern.


I finished the half square triangle quilt on a trip up to Discovery Bay with some crafty friends, my fellow Craftster mod LimeRiot and my guild buddy Britney! Crafting is always more fun with other people...and alcohol :)